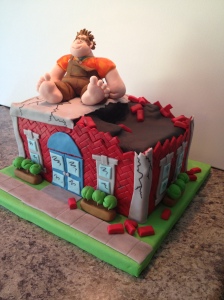
This weekend I made a cake for a friend whose son was having a birthday. She said he loves Wreck-it Ralph, so this is what I came up with.
I used 3 1/2- 9″x13″ cakes and lots of fondant!
After covering the base with green fondant, the entire cake was covered with red fondant. Then, I used a mold to make sheets of red brick to layer over the sides. I covered half of the top with black fondant to make it look like part of the building was missing. Then I added gray fondant to hide messy corners, create the roof, and more for the windows and sidewalk. To texture the sidewalk, I pressed a new clean brillo-type sponge into the fondant after it was in place. Then I made indentations with a straight edge to mimic the lines in a real sidewalk. I added details with a black food marker. I also brushed on some brown dusting powder (edible) to the bricks and the sides of the building to add some depth and dull the brightness of the red fondant.
I made the topper, the bushes, and some loose bricks to decorate the cake base all from fondant with a tablespoon or so of Tylose powder mixed in. This is a quick way to make gum paste from fondant, which hardens much better than fondant, and is good for things that won’t likely be eaten…seriously, this stuff can dry rock hard, and you don’t want someone chipping a tooth!
For the details on Wreck-it Ralph, I used a mixture of red food coloring gel and a little lemon extract to paint the pattern on his shirt (which was made from orange fondant) and to add a little pink to his cheeks. I also brushed on brown dusting powder on his overalls.
It might be good to note that the gum paste decorations can be made far in advance to be given time to dry out completely. Just keep them protected from dust. I also made sure to tell my client not to eat these pieces. Even though they are technically edible, I couldn’t recommend eating rock-hard week-old sugar pieces 🙂
P.S. I apologize for the blurriness of some of the photos 🙂


Wow! What a great looking cake! Do you take Canadian order? I’m sure it tasted as good as it looked, even more so!
Thank you, Jack! Unfortunately, I can only take local orders currently, and Canada is a bit out of reach for me. I’m sorry 😦
I LOVE this cake. Your work is flawless!!!!
Someone wants me to make this one for a party however I’m still not a pro in figures. Will you be able to make Ralph and sell that to me???
Thanks!
Thanks so much! Unfortunately, due to copywrite laws, it would be illegal for me to make Ralph and sell him, since I do not own any legal rights to the character. Maybe you could print out an image, place it under wax paper or plastic wrap, then use piped candy melts or frosting (the kind that hardens) to trace the image. It would be a 2-dimensional figure rather than 3D, but if sculpting doesn’t work out, it’s a good plan B.
I love your design. I need to make Ralph for my grandson’s first birthday cake. Is there a tutorial that you can recommend? I’ve tried making Ralph’s face but it doesn’t seem to come out right. Thanks in advance for any suggestions. Great job!
Hmm…I just looked off of images of Ralph online to make mine, so unfortunately I don’t know of any tutorials. You could try to create a Wreck it Ralph scene and add a toy Ralph. Or maybe focus on other aspects of the movie for the cake and have cut fondant letters spelling “wreck it Ralph” or something. Sorry I can’t be of more help. I sadly didn’t take enough progress photos to make a full tutorial.